1
2
3
4
5
6
7
8
9
10
11
12
13
14
15
16
17
18
19
20
21
22
23
24
25
26
27
28
29
30
31
32
33
34
35
36
37
38
39
40
41
42
43
44
45
46
47
48
49
50
51
52
53
54
55
56
57
58
59
60
61
62
63
64
65
66
67
68
69
70
71
72
73
74
75
76
77
78
79
80
81
82
83
84
85
86
87
88
89
90
91
92
93
94
95
96
97
98
99
100
101
102
103
104
105
106
107
108
109
110
111
112
113
114
115
116
117
118
119
120
121
122
123
124
125
126
127
128
129
130
131
132
133
134
135
136
137
138
139
140
141
142
143
144
145
146
147
148
149
150
151
152
153
154
155
156
157
158
159
160
161
162
163
164
165
166
167
168
169
170
171
172
173
174
175
176
177
178
179
180
181
182
183
|
<table width="100%">
<tr>
<td align="left" width="120">
<img src="apps/web/public/logo.png" alt="OpenCut Logo" width="100" />
</td>
<td align="right">
<h1>OpenCut</span></h1>
<h3 style="margin-top: -10px;">A free, open-source video editor for web, desktop, and mobile.</h3>
</td>
</tr>
</table>
## Why?
- **Privacy**: Your videos stay on your device
- **Free features**: Every basic feature of CapCut is paywalled now
- **Simple**: People want editors that are easy to use - CapCut proved that
## Features
- Timeline-based editing
- Multi-track support
- Real-time preview
- No watermarks or subscriptions
- Analytics provided by [Databuddy](https://www.databuddy.cc?utm_source=opencut), 100% Anonymized & Non-invasive.
- Blog powered by [Marble](https://marblecms.com?utm_source=opencut), Headless CMS.
## Project Structure
- `apps/web/` – Main Next.js web application
- `src/components/` – UI and editor components
- `src/hooks/` – Custom React hooks
- `src/lib/` – Utility and API logic
- `src/stores/` – State management (Zustand, etc.)
- `src/types/` – TypeScript types
## Getting Started
### Prerequisites
Before you begin, ensure you have the following installed on your system:
- [Node.js](https://nodejs.org/en/) (v18 or later)
- [Bun](https://bun.sh/docs/installation)
(for `npm` alternative)
- [Docker](https://docs.docker.com/get-docker/) and [Docker Compose](https://docs.docker.com/compose/install/)
> **Note:** Docker is optional, but it's essential for running the local database and Redis services. If you're planning to run the frontend or want to contribute to frontend features, you can skip the Docker setup. If you have followed the steps below in [Setup](#setup), you're all set to go!
### Setup
1. Fork the repository
2. Clone your fork locally
3. Navigate to the web app directory: `cd apps/web`
4. Copy `.env.example` to `.env.local`:
```bash
# Unix/Linux/Mac
cp .env.example .env.local
# Windows Command Prompt
copy .env.example .env.local
# Windows PowerShell
Copy-Item .env.example .env.local
```
5. Install dependencies: `bun install`
6. Start the development server: `bun dev`
## Development Setup
### Local Development
1. Start the database and Redis services:
```bash
# From project root
docker-compose up -d
```
2. Navigate to the web app directory:
```bash
cd apps/web
```
3. Copy `.env.example` to `.env.local`:
```bash
# Unix/Linux/Mac
cp .env.example .env.local
# Windows Command Prompt
copy .env.example .env.local
# Windows PowerShell
Copy-Item .env.example .env.local
```
4. Configure required environment variables in `.env.local`:
**Required Variables:**
```bash
# Database (matches docker-compose.yaml)
DATABASE_URL="postgresql://opencut:opencutthegoat@localhost:5432/opencut"
# Generate a secure secret for Better Auth
BETTER_AUTH_SECRET="your-generated-secret-here"
BETTER_AUTH_URL="http://localhost:3000"
# Redis (matches docker-compose.yaml)
UPSTASH_REDIS_REST_URL="http://localhost:8079"
UPSTASH_REDIS_REST_TOKEN="example_token"
# Marble Blog
MARBLE_WORKSPACE_KEY=cm6ytuq9x0000i803v0isidst # example organization key
NEXT_PUBLIC_MARBLE_API_URL=https://api.marblecms.com
# Development
NODE_ENV="development"
```
**Generate BETTER_AUTH_SECRET:**
```bash
# Unix/Linux/Mac
openssl rand -base64 32
# Windows PowerShell (simple method)
[System.Web.Security.Membership]::GeneratePassword(32, 0)
# Cross-platform (using Node.js)
node -e "console.log(require('crypto').randomBytes(32).toString('base64'))"
# Or use an online generator: https://generate-secret.vercel.app/32
```
5. Run database migrations: `bun run db:migrate` from (inside apps/web)
6. Start the development server: `bun run dev` from (inside apps/web)
The application will be available at [http://localhost:3000](http://localhost:3000).
## Contributing
We welcome contributions! While we're actively developing and refactoring certain areas, there are plenty of opportunities to contribute effectively.
**🎯 Focus areas:** Timeline functionality, project management, performance, bug fixes, and UI improvements outside the preview panel.
**⚠️ Avoid for now:** Preview panel enhancements (fonts, stickers, effects) and export functionality - we're refactoring these with a new binary rendering approach.
See our [Contributing Guide](.github/CONTRIBUTING.md) for detailed setup instructions, development guidelines, and complete focus area guidance.
**Quick start for contributors:**
- Fork the repo and clone locally
- Follow the setup instructions in CONTRIBUTING.md
- Create a feature branch and submit a PR
## Sponsors
Thanks to [Vercel](https://vercel.com?utm_source=github-opencut&utm_campaign=oss) and [fal.ai](https://fal.ai?utm_source=github-opencut&utm_campaign=oss) for their support of open-source software.
<a href="https://vercel.com/oss">
<img alt="Vercel OSS Program" src="https://vercel.com/oss/program-badge.svg" />
</a>
<a href="https://fal.ai">
<img alt="Powered by fal.ai" src="https://img.shields.io/badge/Powered%20by-fal.ai-000000?style=flat&logo=data:image/svg+xml;base64,PHN2ZyB3aWR0aD0iMjQiIGhlaWdodD0iMjQiIHZpZXdCb3g9IjAgMCAyNCAyNCIgZmlsbD0ibm9uZSIgeG1sbnM9Imh0dHA6Ly93d3cudzMub3JnLzIwMDAvc3ZnIj4KPHBhdGggZD0iTTEyIDJMMTMuMDkgOC4yNkwyMCAxMEwxMy4wOSAxNS43NEwxMiAyMkwxMC45MSAxNS43NEw0IDEwTDEwLjkxIDguMjZMMTIgMloiIGZpbGw9IndoaXRlIi8+Cjwvc3ZnPgo=" />
</a>
---
[](https://vercel.com/new/clone?repository-url=https%3A%2F%2Fgithub.com%2FOpenCut-app%2FOpenCut&project-name=opencut&repository-name=opencut)
## License
[MIT LICENSE](LICENSE)
---
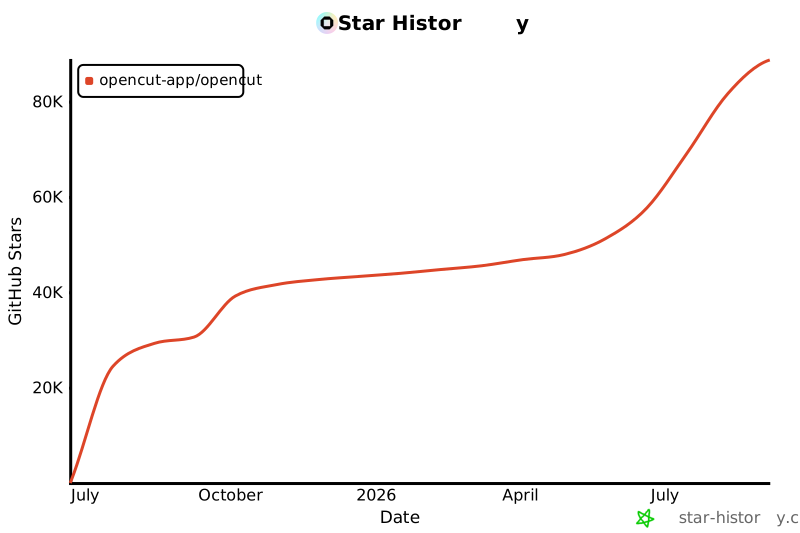
|
